
This help page has step by step instructions on using GarageBand ’11 to record an audio voiceover, using the podcast option. For a screencast version, see mine: How to make an audio recording in GarageBand or Apple’s: Find out how to make a podcast with GarageBand
Contents
CREATE A NEW PODCAST
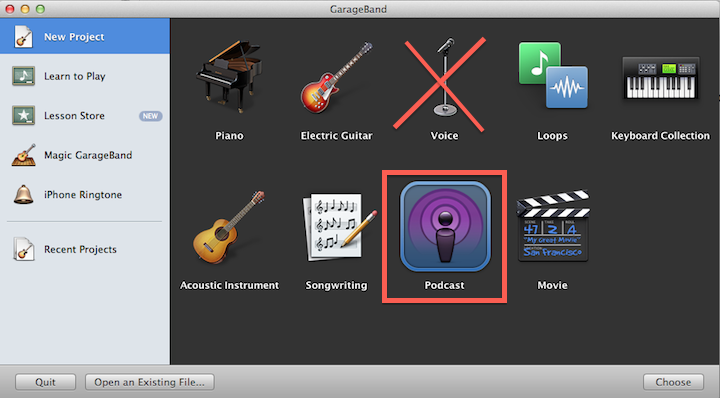
Launch GarageBand and create a new project using the Podcast option, as shown below. Do NOT use the Voice option, as that’s for singing, not speaking (and really should be called Vocals instead).
NAME YOUR NEW FILE
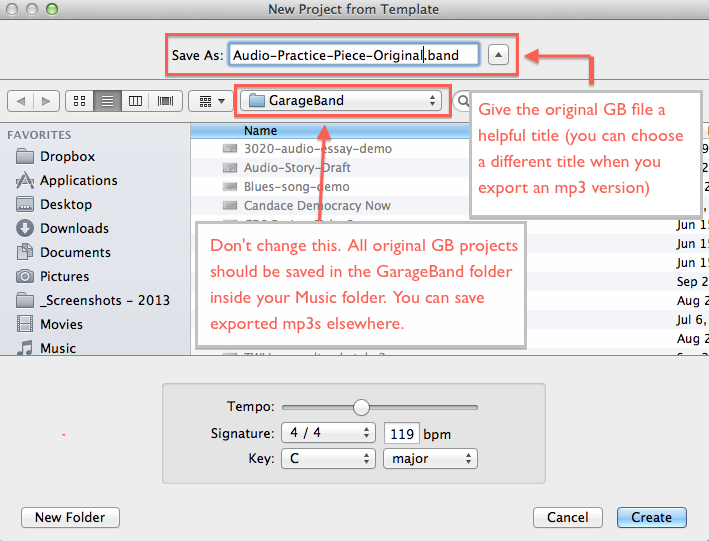
Give the project a title that will be helpful to you. (You’ll follow a specific format to name the mp3 file you export out of GarageBand.)
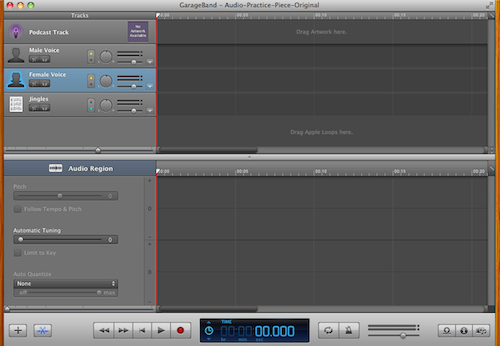
The new project will open with an empty podcast template, like this:
GET TO KNOW THE LAYOUT
The screenshot below shows a project with a sample recording in it (the purple ribbon). To guide you through the interface, I’ve marked the key areas with red boxes and numbers. For explanations that go with each number, see below the screenshot.
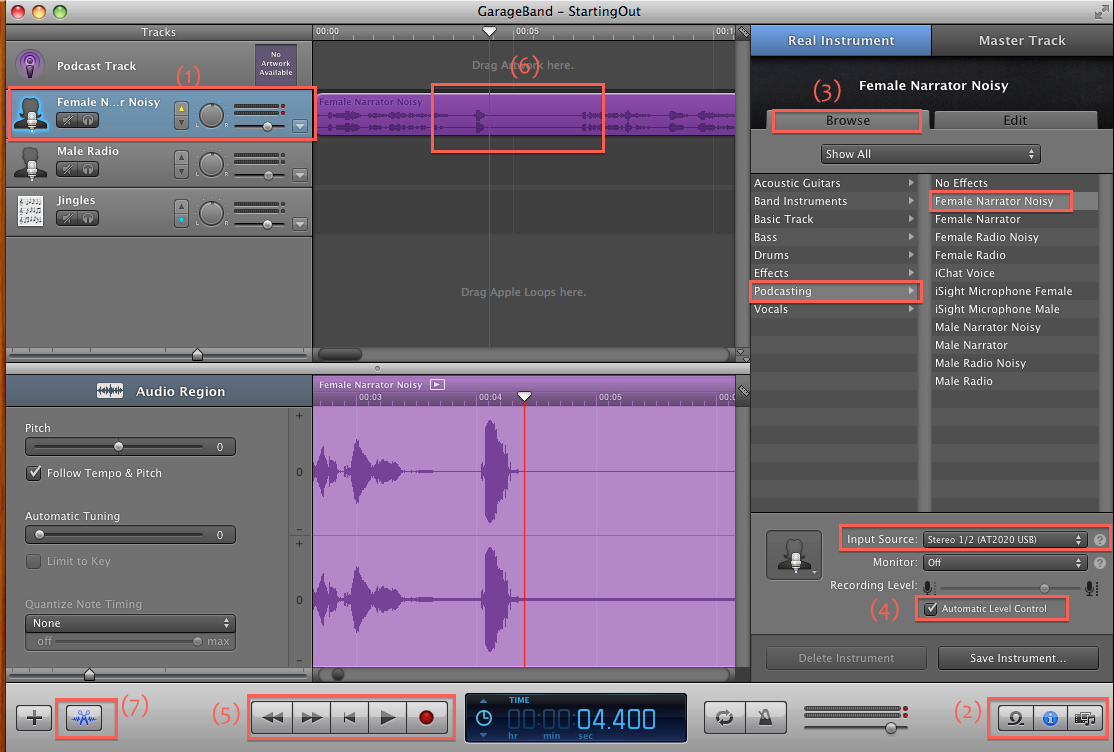
(1) Track Type
Choose the track type that matches your gender. (Note: Mine says “Female Narrator Noisy” because I had already selected that option in the instrument editor.)
(2) Track Info
Click the “i” in the lower right corner to access Track Info. You may not need to make any changes here if you’re recording in a quiet area with good acoustics. But if you’re concerned about reducing background noise, choose the “noisy” narrator option, as described in the next step.
(3) Podcasting Options
After you click the “i” you should see a pane where you can browse effects for your Real Instrument track. Select Podcasting and choose the “Noisy” option for your gender.
(4) Input Source & Volume Control
Below the track options, make sure your input source is correct and also check the box for Automatic Level Control (which helps even out the volume of your recording).
(4a) Edit Narrator Settings
The next step is to check the options for the Narrator setting to make sure echo and reverb are off, which you can do by clicking the Edit tab to the right of the Browse tab, as shown in this screenshot (scroll down for explanations that go with each number in red):
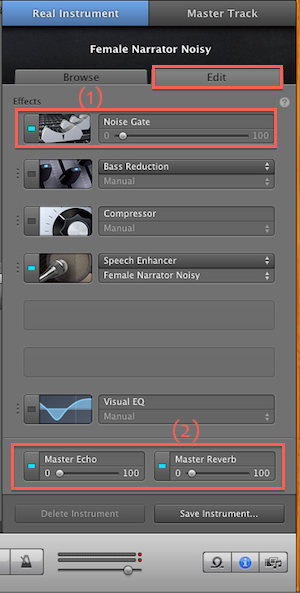
(1) If you’re concerned about recording noisy background sounds in the moments when you’re not speaking, you can experiment with the Noise Gate. The default is 0. For more info, see Apple’s page on the noise gate.
(2) Make sure both the Echo and Reverb settings are set to 0. If they’re not, click the box to the left of each to turn it blue (unless it’s already blue) and then use the slider to take each to 0.
Having some degree of Echo or Reverb on is the most common reason why students end up with recordings that sound like they were speaking in an empty auditorium.
RECORD
The numbers below correspond with the screenshot under Get to Know the Layout.
(5) Recording
Test First: Always do a test recording first, to make sure your microphone is working. Press the red “record” button and say a few random sentences. To listen to the test, click the button with the left arrow pointing at a vertical line, which moves the playhead (the red vertical line) to the beginning of the track. Press the space bar to play (and stop).
If all sounds good, select the purple test ribbon and press the delete key on your keyboard. Now you’re ready to record your narrative.
Then Record: Position the playhead at the beginning of the track and press the record button. WAIT AT LEAST 20 SECONDS before you start speaking.
Why? Because (a) the exported audio file will shear off the first and last 10 or so seconds of your recording; and (b) your listeners need a little preparation before you start talking.
Also wait AT LEAST 20 SECONDS after you finish speaking before you stop the recording.
(6) Sample Oops Spot
If you make a mistake while recording and want to mark the section so you can come back later and edit it, an easy way to do that is to record six or seven seconds of silence, which will produce a flat line on the waveform, as shown in the screenshot. (See the section below on how to edit out unwanted portions.)
(7) Audio Region Editor Toggle
Just in case your screen doesn’t show the “Audio Region Editor” and you’re wondering how I got it to show up, this is the button that toggles it on or off. You might as well leave it off for now, but further down I’ll explain how you can use it to edit your audio.
EDIT OUT UNWANTED PORTIONS
To edit out a portion of a recording, select the track and play it until you get to the portion you want to cut and press the space bar to stop playback. (You can use your arrow keys to move the playhead in small increments.)
Make sure you’re looking at the track at the top and NOT at the Audio Region editor below. If you can’t easily find the portion you’re looking for because the waveform seems too compressed, try zooming in on the track using the zoom slider below the track pane (as shown in the screenshot further down).
When the playhead is in the right spot on the selected track, choose Split from the Edit menu. The track will be split right where the playhead is positioned.
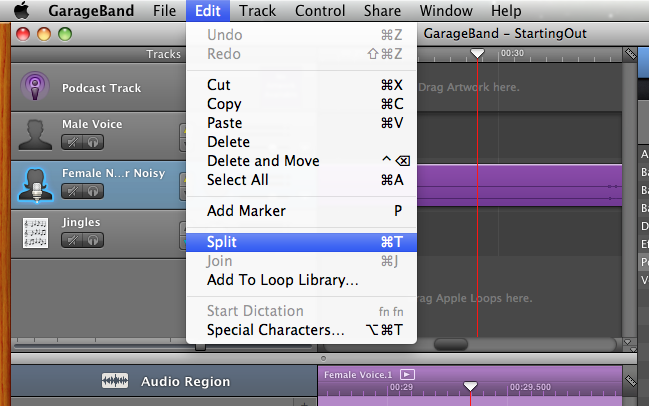
Continue listening until you find the end of the portion you want to cut. Press the space bar to stop the playhead at that spot and choose Split again.
You’ll end up with separate purple ribbons, as shown below (although they won’t initially be spaced as far apart as mine are).
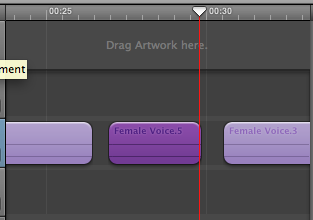
To remove the unwanted portion, select it and press the delete key. You can then click and drag to move the second clip towards the first. (Or you can select both clips and choose “Join” from the Edit menu.)
MOVE PORTIONS AND ADD MUSIC
(For a screencast version of how to add music, see: How to add music to an audio essay in GarageBand)
You can also use the Split track feature to create breaks in your recording where you’d like to make space for music (or for longer periods of silence than you initially recorded).
After you split the track into clips, click and drag to move each clip as far out as you’ll need. (Again, do this in the track editor at the top, NOT in the Audio Region editor at the bottom.)
In this screenshot, you’ll see how I moved audio clips apart, added a music soundtrack, and adjusted the volumes for both tracks. You might also notice that I deleted the podcast and male narrator tracks, using the Track menu. For details on each numbered area, scroll down below the screenshot.
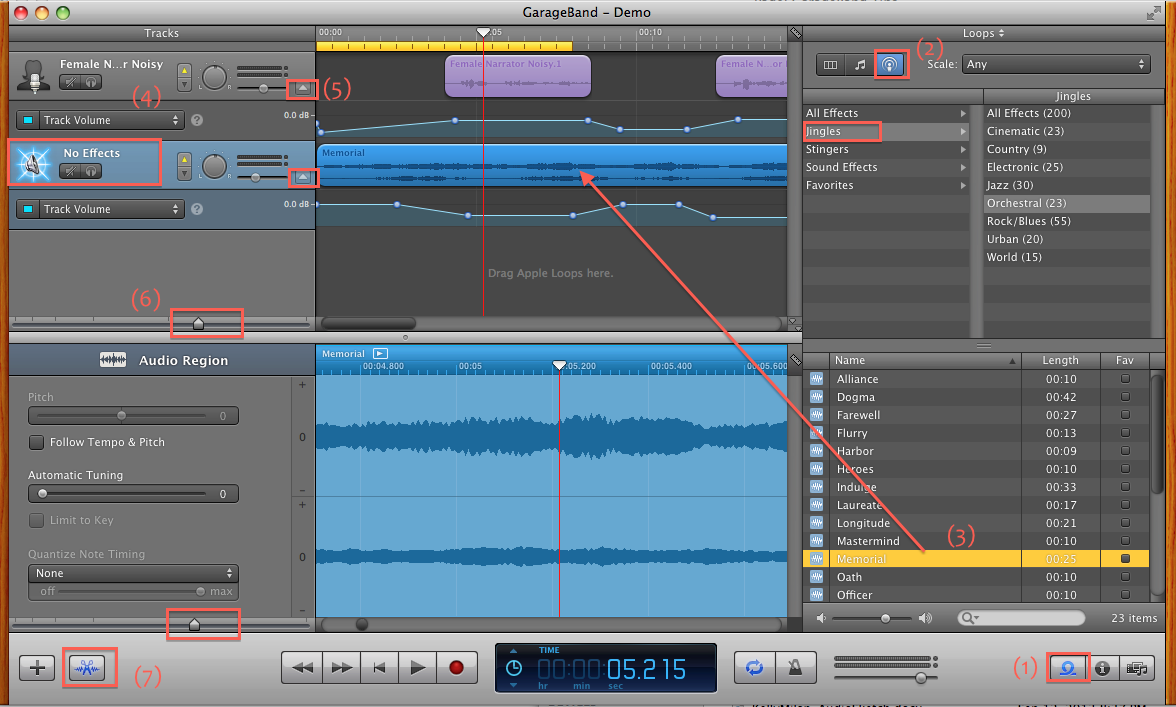
(1) Loop Browser
Click on the “loop browser” to access built-in sounds. If you’d rather use music from your iTunes library, click the third button on this row instead.
(2) Podcast Sounds
Click on the “Browse podcast sounds” button at the top. Stingers are short sound effects sometimes used for transitions, while Jingles are longer clips of music you can use for intros, transitions, and outros. To listen to a sample, click on it in the list below the menu of choices. It’ll immediately start playing. Click it again to stop.
(3) Adding Music
When you’ve found some music you’d like to use (whether from the Podcast sounds or your iTunes library), click and drag the music file onto the Jingle track.
Your track will most likely be called Jingles, but if you deleted it, as I did, you can create a new basic track and drag the Jingle or other music clip onto that.
(4) Ducking
If you don’t see the little up and down arrows like the ones on my narrator and jingle tracks, turn on Ducking from the Control menu.
This option automatically adjusts the volume of the secondary track in favor of the primary track. The primary track is the one with the yellow up arrow activated. To make other tracks secondary, click the down arrow, which will turn blue. (I forgot to do that in the screenshot above.)
(5) Volume Editor
If you want to make further adjustments beyond what happens with automatic ducking, you can do so with the volume editor, which you can access by clicking the little drop down arrow for each track.
The editor starts off with a straight horizontal line at the default volume, but you can make adjustments by clicking on spots along the line and dragging them down (or back up, as needed). But don’t go above the default line, where the line first appeared, as that’ll be too loud. You probably can’t see it in the screenshot, but the default line remains visible as a dark grey line.
In my screenshot, you’ll see that I had ducking on but that I also made a few adjustments to make the music volume fade out and in around the voiceover. These were fairly random adjustments I made for demo purposes and aren’t meant to serve as an example of how you might fine-tune this process. It takes a fair amount of fiddling to get these the way you want them, so I recommend saving this for your last step.
(6) Zoom Slider
Here’s where the zoom slider is, in case you want to expand the viewable area of your audio tracks.
(7) Advanced Editing
If you find it difficult to edit the track, even on maximum zoom, you can use the Audio Region Editor instead. But it can be a bit finicky, as it’s probably better suited to editing multiple music tracks.
I rarely use it, but if you’d like to try, you might start with Apple’s help page on the audio region editor. Also search the web for more info.
EXPORT A SHAREABLE VERSION (MP3)
See this separate handout: How to export an mp3 from GarageBand
MORE GARAGEBAND RESOURCES
If you see a question mark next to an element in Garageband, click on it to access the relevant part of the in-app help documentation. For a web version of that documentation, see Apple’s Garageband Help Pages
These pages might also be helpful, but you can find many more with the right search terms in Google: