
OVERVIEW
This guide explains how to format your documents in Microsoft Word so that they follow the standard rules for formatting academic papers as described in most MLA and APA style books for undergraduate writing. These rules apply to most of the papers you will submit in your college classes, but in some cases your professors will want you to follow specific guidelines that may differ from those below. Always clarify with your professor which set of guidelines he or she wants you to follow before you submit a paper.
Using standard formatting for academic papers shows that you understand the customs of the university community and therefore helps to boost your own credibility. Using unusual or highly distinctive formatting, on the other hand, suggests that your previous schooling did not adequately prepare you for university work. Consider the impact of unusual formatting: not only does it call attention to your paper in a way that might not be positive, professors might also see it as a sign that you’re trying to artificially inflate page length.
Note: These instructions apply to all versions of Word for Mac and for the 2003 version of Word for Windows. I haven’t yet updated them to include instructions for the 2007 version of Word for Windows, but the tools should nevertheless be easy to find if you look around on the toolbar at the top.
Contents
DOCUMENT MARGINS
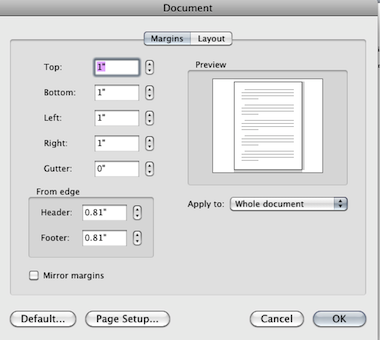
Rule: Papers submitted for review or grading should have 1” margins all around. This should be the default for Word, but if your default setting is to have left and right margins of 1.25”, change your default. Page length requirements are based on 1” margins.
Instructions: Go to the Format menu, drag down to Document, change the margins, and the click on the Default button and accept the change to the Normal template. Make sure you leave the gutter set to 0” or you’ll mess up your document formatting.
INDENTATION
Rule: The first line of each paragraph should be automatically indented.
Instructions: This should be the default for Word, but if not, you might want to change your Normal style, as described above. To change the indentation format for a document, choose Select All from the Edit menu. Then go to the Format menu, drag down to Paragraph, look under the “Special” drop-down menu in the Indentation section, and select “First Line.” This setting automatically indents the first line of a new paragraph so that you don’t have to do it manually.

FONT
Rule: College papers should be in a standard academic font: either Times New Roman or Cambria, in 12pt size. (If you submit a paper in another font, I will change it on the file I download.)
Instructions: Times New Roman or Cambria 12pt should be the default for Word, but if yours is different then change your default. Go to the Format menu, drag down to Style, make sure “Normal” is selected from the list of styles, and click “modify.” Choose the correct font and size from the Formatting menu. Click “OK” to make the change to your default settings.
ALIGNMENT
Rule: The text of your paper should be left aligned, NOT justified, as justified text is hard to read if it hasn’t been professionally typeset. The default in Word is left alignment, so don’t change it.
FIRST PAGE FORMAT
Heading
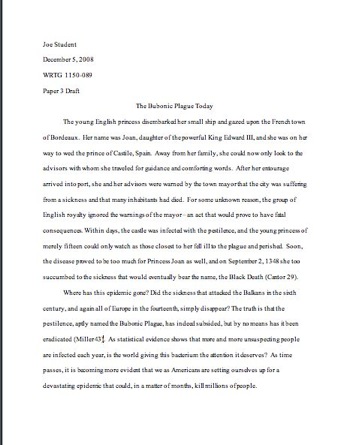
Rule: In the upper left corner of the first page of your document, type your name, the date, the course number and section (or topic), and the version of the paper (such as Paper 1 Second Draft), each on a separate line. Be sure to change the date and paper version when you submit revisions and final versions. See the sample below.
DO NOT use the “headers” feature from the header/footer menu to create this full heading as that will make it appear on every page, which is not customary in academic writing. Also do NOT use a title page unless the assignment specifically asks for one.
Title
Rule: Skip a line after the heading and center an original title that conveys the topic of your paper. Do not use underlining or italics in the heading (unless you’re referring to the title of a book or periodical). Do not use bold text or ALL CAPS.
Sample First Page
PAGE NUMBERS
Rule: All papers should have automatically inserted page numbers that show in the upper right corner on all pages except the first. Do not insert these page numbers by hand. Instead, use Word’s Header/Footer tool.
For documents following MLA format, put your last name and page number in the upper right corner. For documents following APA format, put a short version of your title (instead of your last name) and the page number in the upper right corner.
Instructions: Go to the View menu and choose “Header and Footer.” You’ll see a header box appear at the top and a footer box at the bottom. Click in the header box, type your last name (or title), make it align to the right, and then select Page Numbers from the Insert menu.
When you’re finished, click on the “Close” tab under the Header view. Each page of your document should now display a page number at the upper right that updates automatically when you make changes to the document. It will appear as grayed out text unless you active the Header and Footer tool to make changes.

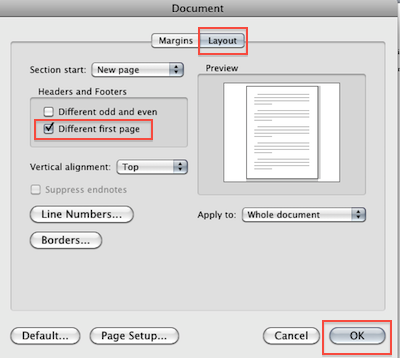
To change the setting so that page numbers do not display on the first page, go to the Format men, drag down to Document, and click on the Layout button. Then check the box next to “Different First Page.” Click OK. If necessary, remove the header that appears on the first page and insert a header on the second page, which will automatically appear on all subsequent pages as well.
SPACING
Document Spacing
Rule: The entire paper should be double-spaced, including the heading and bibliography.
Instructions: Choose “Select All” from the Edit menu, go to the Format menu and drag down to Paragraph, and choose “double” from the “line spacing” menu in the Spacing section. Or you can use these keyboard shortcuts. On a Mac, use Cmd-A to select all and Cmd-2 to double-space. On a PC, use Ctrl-A to select all and Ctrl-2 to double space.
Paragraph Spacing
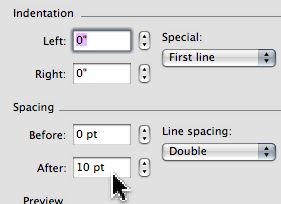
Rule: Papers should have no extra spacing after paragraphs. This should be the default for Word, but if your default setting is to have 10pt spacing after paragraphs, change your default.
Instructions: Go to the Format menu, drag down to Style, make sure “Normal” is selected from the list of styles, and click “modify.” In the lower left corner, select the dropdown menu that starts with “Format” and drag down to Paragraph. In the paragraph settings menu that pops up, change the settings for Spacing After to 0pt.
CREATE NEW PAGE
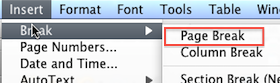
Instead of using a lot of returns before starting your bibliography, create a new page for it following these instructions.
Go to the Insert menu, drag down to Break, and then drag over to Page Break.
BLOCKED QUOTATIONS
Rule: If a quotation will exceed four lines within a paragraph, you should separate it out by blocking and indenting it. As with any quotation, a blocked quotation should be clearly introduced by the sentence that leads up to it and it should also be properly cited, but the rules for blocked quotations are somewhat different. The blocking take the place of quotation marks, and unlike in a regular in-paragraph quotation, the parenthetical citation goes outside of the final period instead of inside of it (given that the blocked quote might contain several sentences.)
Instructions: Type the quotation in its own paragraph, without quotation marks, and remove the indent from the first line. Type the source in parentheses after the last period of the last sentence. With your cursor, select the quotation, from the first word to the end of the parenthetical citation, and click the Increase Indent button from the Paragraph Formatting menu.