
OVERVIEW
This screencast demonstrates how to make a simple voice recording in GarageBand ’11 (which should look similar to GarageBand ’09). The screencast also shows how to export the recording in mp3 format, so that you can share the file with others.
See also:
- Apple help page on GarageBand ’11 – Record your voice and GarageBand ’14 support pages
- How To Create Your Own Podcast in GarageBand
MORE DETAILS
The materials below offer more details on working with GarageBand in both screencast and step-by-step formats.
STEP-BY-STEP INSTRUCTIONS
If you decide to make your audio essay in GarageBand (Mac only), follow these steps:
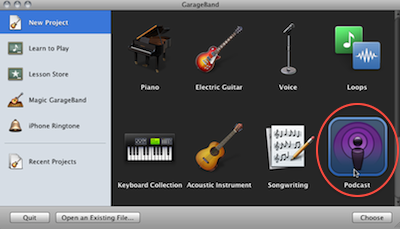
(1) Launch GarageBand. You’ll see a selection of project types. Click on the “Podcast” option in the lower right corner and then click on the Choose button..
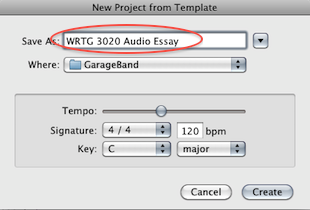
(2) Give the new project a title, such as WRTG 3020 Audio Essay. This is the title the project will be known by within GarageBand. When you export a recording as an mp3 file, you’ll give it a specific file name at that time.
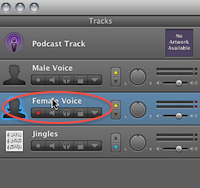
(3) If you’re a man (or have a very low voice), click on the Male Voice track tab. If you’re a woman (or have a high voice), click on the Female Voice track tab. The active tab will be highlighted in blue. Leave the other tracks alone; don’t delete them.
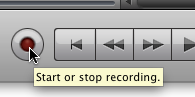
(4) Click the red “record” button at the bottom of the screen.
GarageBand will begin recording. Switch over to your essay (in Word or Google Docs). It’s perfectly fine that you’ll have a few seconds of silence at the start of the recording.
(5) Begin reading your essay, starting with the title and your name. Read slowly and clearly, but in a conversational style.
(6) If you need to pause, press the space bar. To resume, click the record button again.
(7) To listen to your recording, click the “Go to the beginning of the song” button at the bottom, which looks like this:
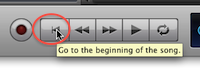
Then click the “Play” button (the right facing triangle). To pause, press the space bar.
- If you want to edit your audio, see below.
- If you want to continue recording where you last left off, move the recording playhead to the right location.
The recording playhead is the red vertical line with an arrow on top that you can click and drag. It looks like this:

(10) When you’re satisfied with your audio recording and are ready to export it as a compressed file that you can share over the internet, see this Help Files page: Exporting an mp3 from GarageBand
Editing Your File
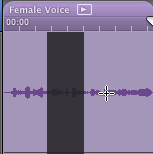
If you want to edit out a part where you stumbled or an unwanted noise was recorded (like a phone ringing or dog barking), double click on the bubble that appears in the Male Voice or Female Voice track. A corresponding editing window will appear at the bottom of the screen (which shows the audio in more detail).
Drag your cursor over the portion you want to cut and press the delete key. This screen shot shows what the editing window looks like after I dragged my cursor across a small section in the middle of a recording:
This image shows what the editing window looks like after I hit delete.
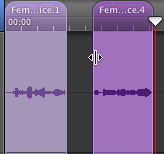
As you can see, you’ll need to drag the two parts of the audio file together, to cover the gap left by the deletion. Put your cursor over the edge until you see the grab bar (the vertical line with two arrows on either side). Then drag the edge until it meets the other edge. (You can also do this by clicking on the bubbles in the Male Voice or Female Voice tracks and dragging them together, which is slightly easier than trying to get the grab bar to appear.)