NOTE: Before you save an image you plan to use in a project that will appear on a public web site, be sure you’ve read and understood the guidelines on this page: Finding images & other media you can use in your projects
The WRONG WAY to Save Images
I’m starting with this section to hopefully reduce the number of students who learn this lesson the hard way.
The wrong way to save images from the web is to drag them into Microsoft Word or a similar application or onto your desktop.
Why not use Word?
Because Word is designed to produce print documents, and as soon as you drag an image into a Word document, the image is converted into a format for print (not for the web or for use in a video). The same is true of any word processing document. Save these apps for preparing papers and projects for printing, not for collecting images!
Why not drag to the desktop?
At least dragging onto the desktop gets you a copy of the image in its original web-ready format (jpg or png). But in many cases, what you’re getting is the thumbnail version, not the full image.
Also, dragging doesn’t give you the opportunity to rename the image files as you download them, which becomes pretty important once you have a dozen or more images to sort through.
The RIGHT WAY to Save Images
Download, Don’t Drag
If the image you want to save has a download button, click on that, as that’s your best bet for getting the full image in the highest quality. That way you have more to work with even if you end up cropping or reducing the size of the image.
If the image does not have a download button (but you’re certain it’s one you’re permitted to re-use), follow these steps:
(1) Right Click on Image
Right-clicking on an image will activate a contextual menu, just as it does elsewhere on your computer.
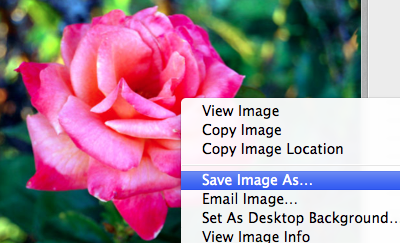
The options on the contextual menu will vary, depending on which web browser you’re using, but here’s what they look like in Firefox for Mac:

(2) Choose “Save Image As”
In Firefox I would choose “Save image as,” but all web browsers have a similar option, even if the wording is different.
(3) Rename the File
In the dialog box that appears, take a look at the file’s original file name. If it’s completely unhelpful, like this:

Rename it to something more helpful, like this:

(4) Choose a Destination Folder
Specify a location for the downloaded image that will be easy for you to find later.
Your computer (Mac or Windows) wants you to save images inside the the default Pictures folder, so that’s a good place to create a folder for reusable images you’ve gathered.
Important Step: Save Image Sources!
If there’s any chance you’ll end up using this image in a public project, go ahead and RECORD THE URL OF THE PAGE where you found the image, as it can be awfully hard to find this information later. You might record these URLs in a text document saved in the same folder as the images you downloaded, or in a note app like Evernote, Stickies, or Notational Velocity.
Right Way to Save Image URLs
The URL you record should start with the domain name for the web site where the image appears. For example, here’s the URL I would save for the rose image above:

Wrong Way to Save Image URLs
Do NOT record a URL from a search results page, like this:

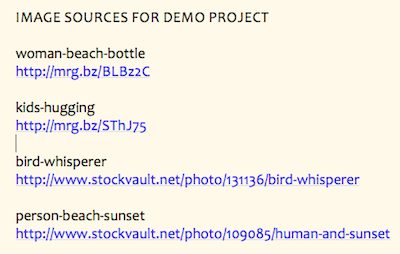
Sample Source Note
Here’s an example of how you might keep track of the sources for each image. These are the sources for some images I found for a class demo, saved in nvALT, a text-based note program I use regularly. The phrases above each URL are what I used to rename the photos, and I just copied that part over to the source sheet to remind me of which photo goes with which source.

