
Follow these steps when a weekly assignment page directs you to do so.
If you’d prefer to compose in a separate app, I recommend using a plain note app (like Evernote or Notes), rather than a word processing app, as you shouldn’t apply any formatting until AFTER you’ve copied and pasted the text into a post editing window on WordPress.
Contents
(1) Open your blog’s dashboard
Follow one of the methods below.
(1) Log into WordPress.com
(2) Click on My Sites in the upper left corner
(3) Go to your blog’s dashboard by following the WP Admin link

SHORTCUT METHOD
Add /wp-admin to the end of your blog’s URL and that will take you to your Dashboard. Bookmark the page for easier access.
For example, here’s a shortcut for how I can get to the Dashboard for my storytelling class blog:
![]()
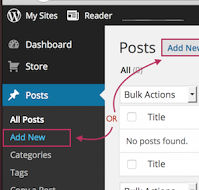
(2) Create a new blog post
Look under the Posts area on the Dashboard sidebar and click Add New, as shown here:
(3) Enter your post and meta details
Select the category you set up for blog posts that are personal in nature.
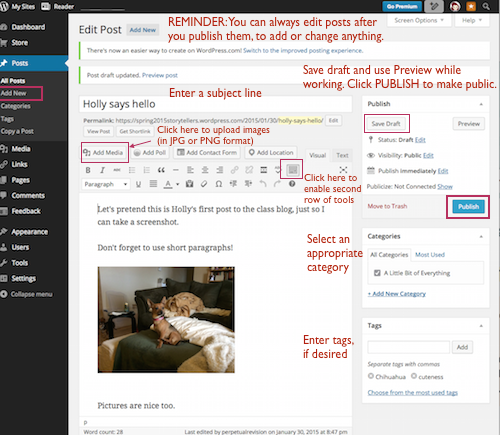
(4) Publish your post
When you’re ready for the rest of us to see your post, click the blue Publish button in the Publish section of the post editing interface (shown above).
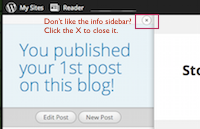
You should then see your post as it will appear on the “front end” of your blog (within the theme you’ve selected). You’ll also see an info sidebar that WordPress puts there for your eyes only, but you can click the x to close it.
If you later want to edit this post (or create a new one), go back to your Dashboard and look under the Posts tab.
To view your new post in the context of your blog’s home page, go to your blog’s URL. Easy way: remove the wp-admin from the end of the blog URL in your browser’s location bar.
BONUS: Embedding an Image
Want to embed one or more images into your post? Here’s how:
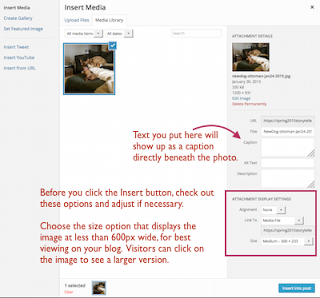
- Put your cursor in the intended spot, add a return to create some space, and click the Add Media button (see interface screenshot above).
- Drag the JPG or PNG image from your computer onto the Add Image window.
- Once the image has uploaded, choose the Alignment you want, what the image should link to, and which size to display.
- Alignment: centered generally works best; left or right will wrap the text around the image (can cause headaches)
- Link: Media file is usually fine, unless you want to link to the image’s original source
- Size: Medium usually works best, or any size that’s around 600 pixels wide
- Click the blue Insert into Post button
To make changes, just click the image as it appears in your post editing window to access the image editing interface.
REMINDER: Only post images you have permission to post or that are free to use under public domain or Creative Commons licensing! See this help page for more: GUIDE – Finding IMAGES You Can Use in Your Digital Composition Projects