
NOTE: I originally wrote this material for a Fall 2013 calendar entry, for students who were recording “solo” interviews (as though the interviewer was off camera). But I’ve added info relevant to those recording interviews between two people.
Contents
UNDERSTANDING FRAMING AND FOCUS
Rule of Thirds
The “tried and true” method of framing a subject for still or video shots is to follow the rule of thirds.
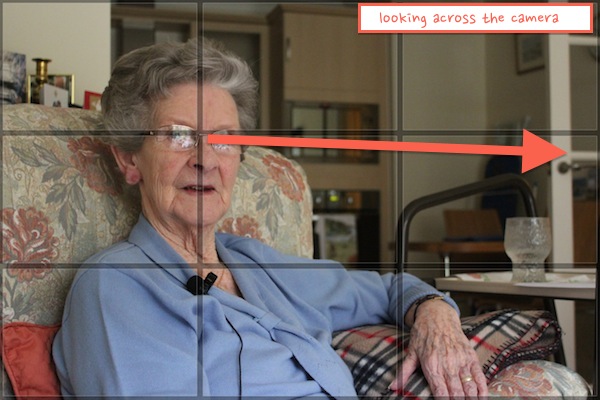
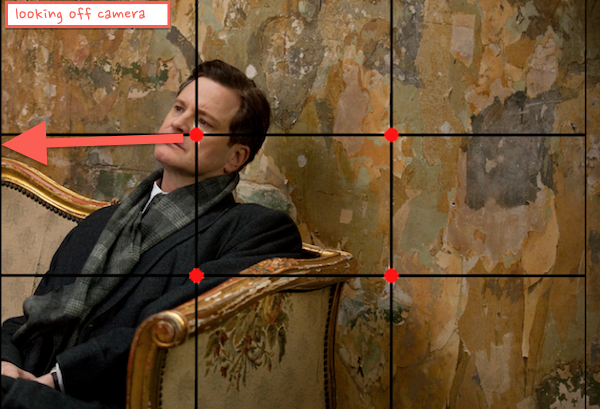
Many cameras come with a built in grid that enables you to divide the screen into three rows and columns. Your goal is to position the camera so that the subject’s face stays roughly in the point where the lines cross in the upper left or right corner of the grid. Both subjects below are in the appropriate position.
Focus Options
Traditionally, subjects should focus their attention “across the camera,” so that it looks like they’re speaking to an interviewer just to the side of the camera. The first shot below illustrates what I mean.
Conventional Focus: Across the Camera
If you want your video interview to follow the customary conventions, meaning that it will look like what most viewers expect a video interview to look like, then use this approach.
Any other approach, including having the subject look directly at the camera, is likely to call attention to itself because it’s not customary, which means that viewers might be distracted by it.
Unconventional Focus: Off the Camera
If you want to go against your audience’s expectations, you might try an unconventional approach to focus, such as having the subject look “off the camera” instead of across the camera.
The screenshot below is from the movie The King’s Speech, and the director deliberately framed shots like this in order to emphasize how isolated the character felt from the rest of the world, due to his speech disorder.
Resources to Learn More on Framing
For more info, watch this short video, which will hopefully help you see why you’d want to avoid filming with the subject in the center:
This video and several others are on the Framing and Composition page of Vimeo’s “Video School” series.
TIPS FOR SETTING UP THE INTERVIEW
Lighting
Aim lights towards each subject’s face in an effort to light up any shadows. These are sometimes referred to as key and fill lights. If possible, add a backlight to further brighten dark areas.
See: Three Point Lighting
Sound
Record in a smallish space that’s well-padded, to reduce the chance of echoes.
Solo: a walk-in closet or a car (parked in a quiet area) are good choices
Two or more: look for a smallish den or bedroom with carpet and soft decor
Check the spot by closing your eyes and listening for ambient sounds. If you hear light fixtures or appliances humming, either turn them off or choose a different spot.
Use an external mic, if possible, especially if you’re recording into a laptop.
Framing
Solo: position the camera so that your face is in the upper left or right corner, following the rule of thirds illustrated above. The top of your head should be at or above the top of the camera’s frame.
Two (interviews): same as for solo, but position one face in the upper left and the other in the upper right
Focus
Unless you have a clear purpose for looking directly at the camera (like, for example, you’re recording a video blog entry), it’s customary for video subjects to look across the long side, as explained above.
Solo: look across the long side of the camera, as though you’re talking to an interviewer who’s about 45 degrees away from the camera. You might put your laptop there with your speaking notes.
Two or more: look at each other, NOT at the camera. You might want to put a laptop off camera so one interviewer can easily check it for interview notes.
Plan Your Closing
Before you start recording, have a plan in mind for how to bring the interview to a close. Otherwise you may end up just rambling on and fizzling out.
Test Recording
ALWAYS do a 30 second test recording before you launch into your actual recording. That’ll save you the heartbreak of delivering the most amazing story ever, only to discover that the camera wasn’t focused on you, the mic wasn’t recording, or some other problem rendered the session a loss.
Watch your test recording closely to check for: framing, lighting, sound, and so on. Then make adjustments as needed. If you made notable adjustments, do another test recording to make sure they improved matters.
TIPS FOR RECORDING THE INTERVIEW
Speak Slowly
Before you start talking, take a deep breath, center yourself, try to relax, and speak more slowly than you would in a face-to-face conversation that isn’t being recorded. In other words, aim for a bit more poise and self-control than you would have while chatting with a friend over coffee.
We’ll be able to hear you more easily, and you’ll have an easier time finding spots where you can cut portions of your footage.
Project Your Voice
If you sit with your spine in alignment (not slumped) and breathe from your diaphragm (belly goes out, not chest), you’ll find it easier to speak clearly and loudly enough for someone to hear you across the room, without needing to raise your voice to the level of a shout.
Pause Between Questions
After an interviewer asks you a question, pause a few beats before you begin your answer.
After the interviewee stops speaking, pause a few beats before asking another question.
Not only will this make your interview easier for viewers to follow, it will also make it easier for you to edit out entire question and answer segments you decide to scrap.
Build in Visible Breaks Between Segments
If you mess up, make a gesture that will be visible to you when you later skim your footage (since you can’t skim the audio). For example, if you make a mistake and don’t want to stop and restart the camera, do something like stand up and wave your hands, then sit back down, wait a few beats, and start over.
Likewise, if you’ll be patching together different responses to the same set of questions, then have each interviewee make a visible gesture between answers to each question. The most helpful visual is a card that indicates the question the interviewee is about to answer, as that will make these answers much easier to find when you review your footage. (You will, of course, not include these portions of the footage in the final cut.)