
I created this help page for students who will be making video blog entries or video interviews for the first time, using iMovie ’11. The steps below are very basic and apply only to live video recording, not to video editing or to working with photos or audio. For help with those aspects, browse the Using iMovie category.
For more help with recording into iMovie, including some help with troubleshooting, see Apple’s help pages:
- iMovie ’11: Record video directly into iMovie
- Record Video in iMovie with your iSight Camera
- iMovie: Add Video to a Project
RECORDING
Launch iMovie & Record
After it launches, click the camera icon.
![]()
Start Recording
A FaceTime camera will launch. Click the record button when you’re ready. You might find it helpful to give your new recording (which iMovie will call an “event”) a name.
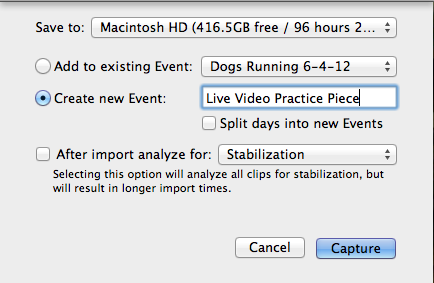
After you click the capture button, wait a few moments and then begin your recording. (You can always edit out the beginning, particularly if it includes you looking at the laptop in order to find the camera icon.)
Finish Recording
When you want to stop recording, click Stop. If you want to continue your recording, click Capture again. Or, if you’re ready to edit the recording, click Done.
VIEWING & SHARING
View Your Recording
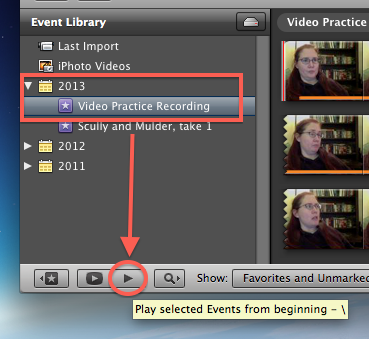
After you click Done, iMovie will create a new “event” from your recording. The event is the original footage, which always remains available, regardless of what you do with it in projects. In other words, even if you drag the event into a project and edit dramatically or delete parts of it, the original will remain untouched in the events browser.
To view an event, select it in the event browser and click the play button below the browser:
Create New Project
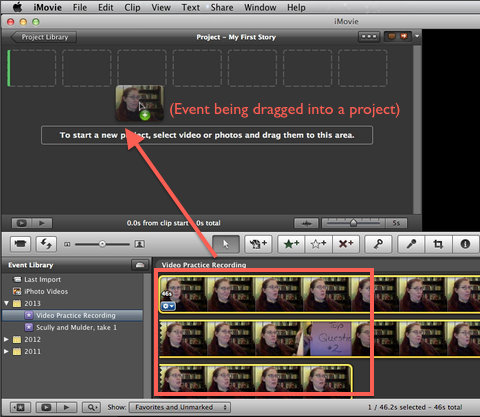
A “project” is a space within iMovie for assembling a new movie, using clips from your events browser as well as from your music, photo, title card, and transitions browsers.
You’ll need to create one in order to do anything with your event (other than view it). Choose New Project from the File menu and give it a helpful project name. Leave the default settings as is.
For more details on creating a new project in iMovie, see the Getting Started section on: Tips for working with iMovie ’11)
Drag Events to Project
Select the event(s) you want to include and drag them into the new project “assembly” space.
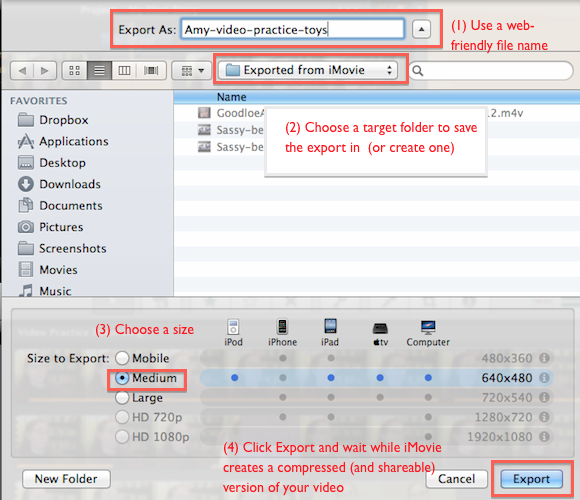
Export Web-Ready Video
An original project file in iMovie potentially contains multiple layers of information, including video, audio, and photos. While these are in your iMovie project, you can move them around and make changes. But to share your video with others, you need to export a version that is both compressed and also non-editable.
With your project open, go to the Share menu at the top and select Export Movie. The CORRECT option is the only one with a keyboard shortcut, as shown here:
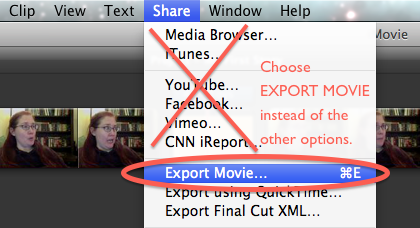
If you don’t see the window below appear, you did not choose the correct export option. Follow the steps indicated on the screen shot.
For more details, see: Exporting your iMovie ’11 project in a shareable format
MORE HELP RESOURCES
Check out Apple’s fairly comprehensive online manual on Using iMovie ’11
This screencast might also be helpful, but I made it in 2011 so some aspects might be outdated:
NOTE: In the video I ask you not to use the “Export to QuickTime” format, but if that’s your only option, that’s fine. Just use the default settings. You can upload .mov files to most video hosting sites. I also suggested in the video that you’d be uploading videos directly to blog entries, but that ended up not being a good option.