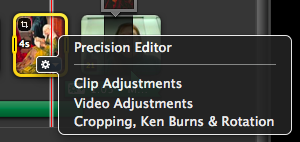
You can adjust any images you drag into iMovie by cropping or rotating them or by making them pan or zoom (i.e., the Ken Burns effect). Any adjustments you make to the images within iMovie are “non-destructive,” which means that the original images won’t be changed in any way. iMovie only applies your adjustments to the exported (and compressed) version of your video.
To access the menu for making image adjustments, hover your mouse over a photo and then click on the gear icon that appears. Select the tool you want from the dropdown menu.

TIP: If you don’t see all of the image in your preview window, check the “Cropping, Ken Burns, and Rotation” tool, as you may need to change the setting from Crop to Fit in Frame.
USING THE KEN BURNS EFFECT
When you apply the Ken Burns effect, make sure you don’t let anyone’s face slide off the screen, unless you have a clear rhetorical purpose for doing so.
You also don’t need to apply it to every photo, as the motion can start to seem repetitive, so think strategically about when to apply the effect and when to let a photo be still on the screen.
Here are some help resources on how to apply or change the effect: in iMovie ’11 or iMovie ’13
(Coming soon: a separate handout on “Don’t Let Ken Burns Direct Your Movie”!)
