
- HOW TO – Set up your new WordPress.com blog (covers one-time steps in the setup process)
- RESOURCES – Get more help from the WordPress.com Help Center
This help page shows you how to use your WordPress blog on a day to day basis. The steps below assume that you’ve already set up your blog and logged into your WordPress.com account.
Contents
- 1 USE THE WP.COM READER
- 2 VIEW NOTIFICATIONS
- 3 OPEN YOUR BLOG’S FULL DASHBOARD
- 4 MOVING BETWEEN DASHBOARD & FRONT END
- 5 APPROVE & VIEW COMMENTS
- 6 CREATE & EDIT BLOG POSTS
- 7 USING CATEGORIES & TAGS
- 8 ADD LINKS & MEDIA TO POSTS
- 9 APPLY READER-FRIENDLY FORMATTING
- 10 ADJUST POST VISIBILITY & DELIVERY
- 11 CREATE & EDIT PAGES
- 12 CUSTOMIZE THE TOP MENU
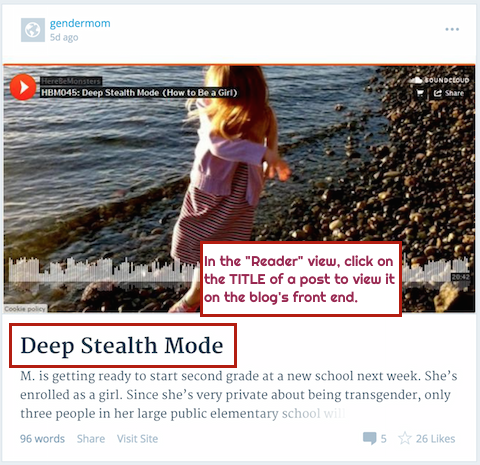
USE THE WP.COM READER
When you first log into WordPress.com, you’ll see their “Reader” interface, which shows you a feed of recent posts on blogs you follow.
Using the Reader
TIP: Control- or command-click on the link to open it in a new tab.
If you’d rather use a blog reader with more features, like the ability to group blogs by topic and to see which posts you’ve read and which you haven’t, you have lots of options to choose from. I use Feedly.com, but you can learn about others on this review of 10 Free RSS Readers.
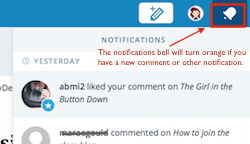
VIEW NOTIFICATIONS
Whenever someone comments on or likes one of your posts or follows your blog, WordPress will alert you via the “notifications bell” in the upper right corner of the admin bar.
Getting lots of emails from blogs you follow? Follow the step on the Blog Setup guide that shows you how to turn those off.
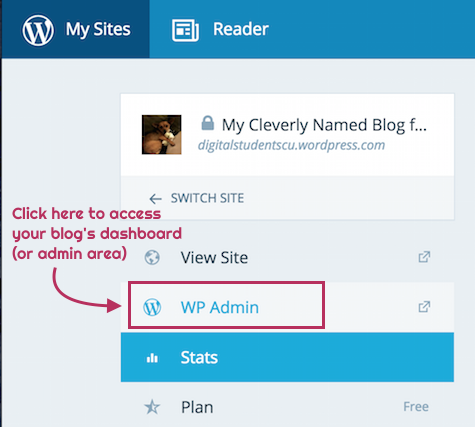
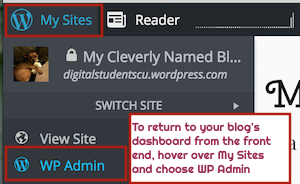
OPEN YOUR BLOG’S FULL DASHBOARD
To get to your own blog’s full dashboard:
- click on the My Sites tab in the upper left corner
- then click on the link to WP Admin
(For more info on accessing the FULL dashboard and not the “beginner’s area,” see the first item on the guide to setting up your blog.)
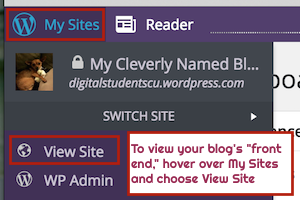
MOVING BETWEEN DASHBOARD & FRONT END
You can always view the front end of your blog (to see changes you’ve made) by clicking on “View Site” from the menu that appears when you hover over the top left corner of the Dashboard.
APPROVE & VIEW COMMENTS
Approve New Comments (as needed)

Like the screenshot says, this means you will have to approve EACH PERSON’s FIRST comment on your blog. So, for example, if your class has 19 students, you may need to do this 19 times (including once for me).
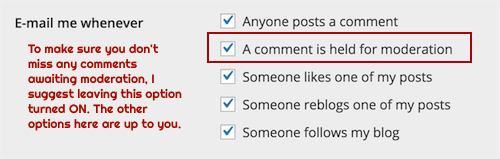
If you have the option shown below checked on your Discussion settings page, you should get an email alert when you have a new comment awaiting your approval (as covered here on the Set Up instructions).
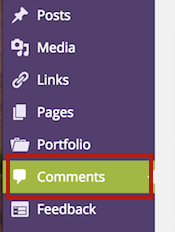
But you can also tell if you have comments awaiting approval by taking a glance at the Comments tab on your blog’s dashboard. If you see a number next to the Comments tab, as shown below, that’s the number of comments that are waiting on your approval before they’ll appear on your blog.
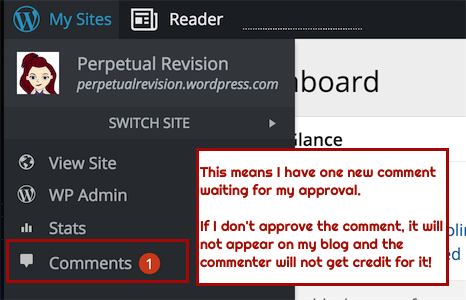
Your classmates are DEPENDING ON YOU to approve their first comment so that they’ll get credit for posting it and for posting additional comments on your blog.
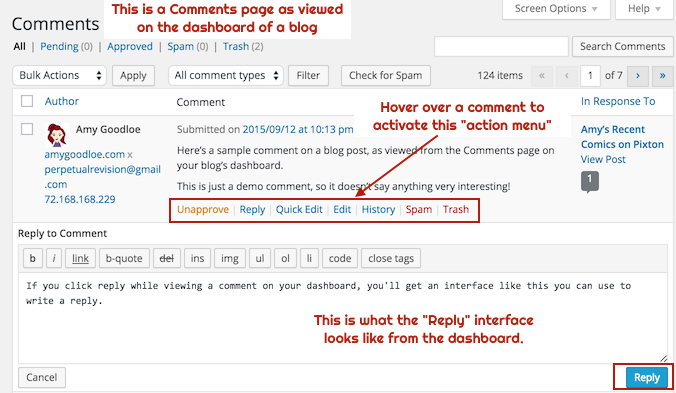
View Recent Comments
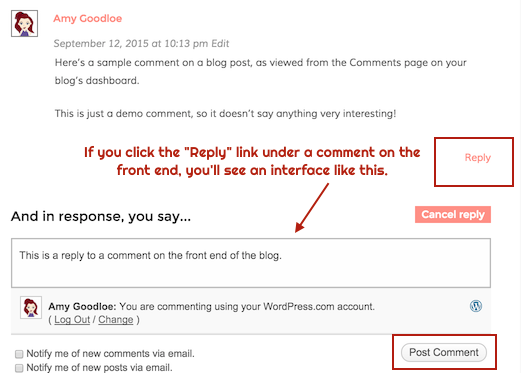
Reply to Comments
Here’s a screenshot that shows you what it looks like to reply to a comment on the front end instead.
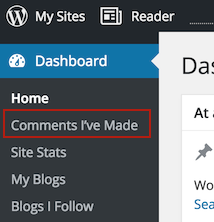
How to View Comments YOU'VE LEFT for Others
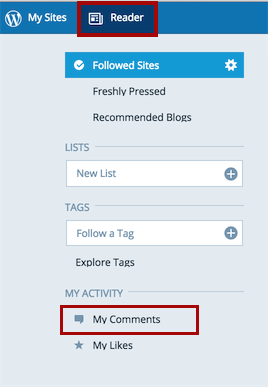
You can also get to your comments stream from the your main blog’s dashboard, using the “Comments I’ve Made” link near the top of the left sidebar, as shown below.
Regardless of how you get there, when you browse for your own comments, you’ll appreciate the value of having a distinctive avatar!
![]()
CREATE & EDIT BLOG POSTS
How to Create a New Post
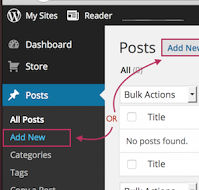
Enter an appealing subject line, select the appropriate category, add tags if applicable, and enter your post’s content in the editing window.
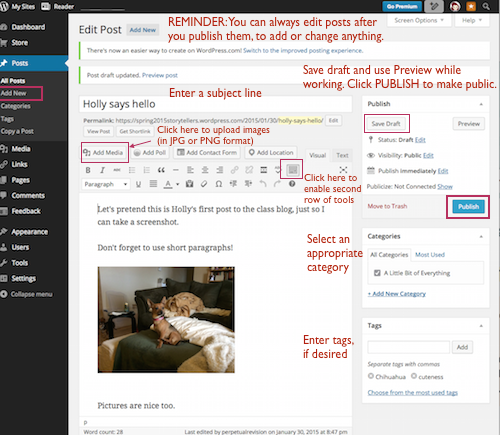
When you’re finished working on the post, either save it as a draft or publish it for others to view.
Also see this WordPress.com support page: Creating a new post
How to Paste Content from Another App
Unless you’re using a “plain text” application (like TextWrangler or Notational Velocity on Macs or Notepad on Windows), what you copy from the application into your blog post will carry with it lots of unnecessary formatting info that will just mess up how your post appears on the front end. Here are two tips to avoid this problem:
(1) Do NOT apply any formatting to your writing when it’s still in the other application. Instead, plan to use the WordPress formatting toolbar to apply formatting like bold, italics, heading levels, and so on.
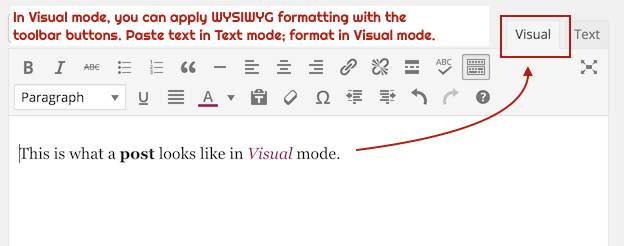
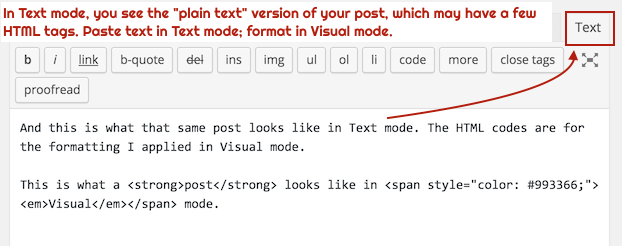
(2) Before you paste the writing into a new blog post box, click on the Text tab. After you’ve pasted the writing, you can switch back to the Visual tab. The screenshots below show you how to switch between the two modes:
How to Edit Posts
Use QuickEdit to Change Categories or Title
Hover over the post title to access the QuickEdit option, and click on it.
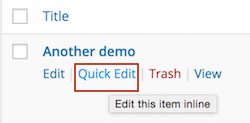
Here you can make quick changes to the post’s metadata, like removing and adding categories and tags, changing the post status from draft to published, or revising the title.

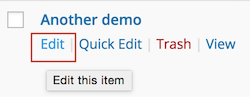
Use Edit to Revise the Post Content
To open the original post editing page, hover over the post title and click edit, or click the post title itself. In addition to making changes to metadata, you can also revise the post itself from this interface.
USING CATEGORIES & TAGS
Rhetorical Purpose of Categories
Consider the purpose of Categories from the readers’ perspective. Categories help readers determine which of the broad topics under discussion on a site your post fits into.
Readers can see which category each post is in when they browse the most recent posts on the blog main page, and they might use that information to help them decide which posts to read. Readers can also view only the posts in a particular category by following the appropriate link in the Categories sidebar.
You might not currently be using either of these methods to explore posts on blogs you visit, but consider how helpful categories might be later on, when you want to return to a particular conversation.
More importantly, consider how categories impact the way people find your posts — or whether they can find them at all. If you have a category like “Creative Writing” and you forget to assign the post with your best short story in it, your viewers may never find the post if they look for it only by browsing that category.
If you forget to specify a category for a post, it will be given the default, which is “Uncategorized.” And nothing says “newbie” than posts in this non-category!
So selecting the right category for your posts is actually a significant part of the process of using writing to communicate with other people.
Rhetorical Purpose of Tags
Now let’s consider Tags. Readers can always use the site search box to search an entire site for particular words of interest, so tags aren’t necessary for the purpose of searching. But tags serve other rhetorical purposes. For example:
- they give readers a sense for what the writer of an individual post felt were his or her key ideas
- they allow readers to easily visualize which topics are being discussed most often, given that the most often used tags grow larger in the Tag Cloud
- they give readers another way of sorting through information on the site: by clicking on a particular tag
So before you assign a tag to a blog post, ask yourself whether the tag will serve a useful rhetorical purpose. For example, in the context of a blog for my WRTG 3020 on the rhetoric of gender and sexuality, it’s not all that useful to use the tag “gender,” given that the entire class is about gender. But more narrow tags like these might be useful: gender norms, gender identity, gender expression, and so on.
ADD LINKS & MEDIA TO POSTS
Creating Hyperlinks
Here’s how to do it on WordPress.com: Creating hyperlinks in your posts
Inserting Photos, Graphics, & Scanned Images
Make sure it meets the criteria for reusable images on my guide to Finding Images You Can Use in Digital Projects.
Do you want to share a handwritten item in image format?
Either scan the item using a flatbed scanner or snap a photo of it using a scanning app on a smart phone (which works much better a photo app). See this March 2015 LifeHacker review of the Best Mobile Scanning Apps.
Is the image in a web-ready format?
Photos are typically in JPG format, while screenshots and line art are typically in PNG format. Animated GIFs are, of course, in GIF format. If the image file isn’t already in one of these formats, you’ll need to convert it first.
Is the image a good size for sharing on the web?
The image display size should be under 1000 pixels wide, and the file should be under 300kb in size. See this guide for info on checking and changing these sizes.
Are you all set now and ready to insert the image into your post?
Follow these steps:
(1) Put your cursor in the intended spot in your post, add a return to create some space, and click the Add Media button.
(2) Drag the JPG or PNG image from your computer onto the Add Image window.
(3) Choose the Alignment you want, what the image should link to, and which size to display (as shown on the screenshot below):
Link: Media file is usually fine, unless you want to link to the image’s original source
Size: Medium usually works best, or any size that’s around 600 pixels wide
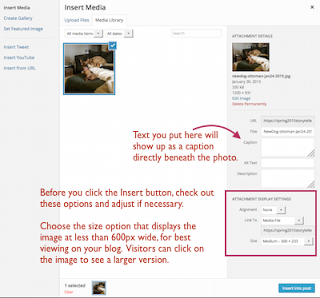
(4) Click the blue Insert into Post button
Want more help?
Check out the WordPress.com support page on Uploading and inserting media into your posts (images, PDFs, etc.)
Attaching PDF Files
(1) Click in your post editing window in the spot where you want a link to your PDF to appear.
(2) Click the Add Media button and drag the PDF file onto the uploader
(3) Click the blue Insert into Post button.
FYI: Unlike images, PDF files will not be embedded. Instead, you’ll see that the file name now appears as a hyperlink, which is why it’s important to use a reader-friendly file name.
Inserting Playable Videos
Did you create the video?
To share a video you created, you’ll first need to upload it to a hosting site OR to Google Drive (where you set the Sharing settings to “anyone with the link”). See: GUIDE – Uploading Videos to Web Hosting Sites. Then you can follow the steps below.
Is the video on a hosting site?
Like most social media sites, video hosting sites usually have a button you can click to get the video’s “shareable URL,” which is a simplified version of the URL (not an embed code). If you’re not sure what I mean by this, see my guide to embedding videos in blog posts.
(1) Copy the video’s SHAREABLE URL
(2) Return to your blog post and click in the editing window where you want the video to appear (leaving a blank line before and after it)
(3) Click on the “Add Media” button and select “Insert from Link”
(4) Paste the shareable URL you copied
(5) If the video’s preview appears, go ahead and insert it. If it doesn’t, then back up and make sure you copied the shareable URL.
(6) What will appear in your post is a WordPress.com “short code” (in square brackets) that surrounds the video URL.
FYI: If you come across a video that offers an embed code that starts with a left angle bracket and the word iframe, that’s an HTML-based code that you can’t use on WordPress.com
For more details, visit the WordPress.com support page on Embedding videos from popular video hosting sites into your posts.
Inserting Playable Audio Files
Did you create the audio file?
To share an audio file you created, you’ll first need to upload it to a hosting site OR to Google Drive (where you set the Sharing settings to “anyone with the link”).
The most popular audio hosting site is SoundCloud.com, and WordPress makes it easy to embed playable audio files from this site.
Is the audio file on another hosting site?
Audio hosting sites other than SoundCloud may have a button you can click to get a “sharable URL” or a WordPress.com “shortcode” (with square brackets instead of angle brackets and no HTML code).
Or, if you have the URL that goes directly to the web-ready audio file (.mp3, .m4a, .ogg, or .wav), you can embed it using the shortcodes shown on the WordPress.com Audio support page.
Inserting Other Content
category: Shortcodes
APPLY READER-FRIENDLY FORMATTING
FYI: These formatting tips work on both posts and pages.
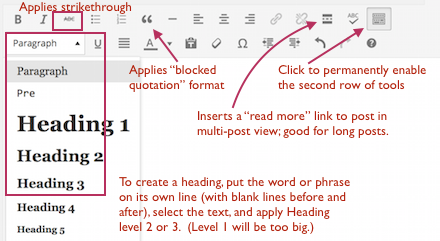
In the screenshot below, I’ve highlighted a few aspects of WordPress’s formatting toolbar for Visual mode. (If your toolbar looks different, you may be in Text mode, so click the Visual tab to switch.)
Also see these WordPress.com Help Pages:
- Using the post editing interface (covers all options on a new post screen)
- Using the Visual Editor (covers the formatting tools available)
Use Left Alignment
Research into how people read on the web reveals that readers are most comfortable with content that is left-aligned (not centered and not justified). Our eyes expect the left side of the content to be flush against an imaginary vertical line, but not necessarily the right side.
Use Short Paragraphs
Research also shows that unless they have reason to trust in the competence of the writer, most readers will skip articles that use long paragraphs. On the web, a paragraph with the same number of words can look shorter or longer depending on the site’s design, so you’ll need to experiment to find a paragraph length that seems fairly short on the front end of your own blog.
Readers also appreciate it when articles are easy to skim, which means that the opening sentence of each paragraph should give the reader some kind of clue about the paragraph’s main idea, and the rest of the paragraph should stay focused on that idea. Paragraphs as short as one sentence are perfectly fine, if you only need one sentence to convey a particular idea.
Using Heading Format
In the second row of the toolbar you’ll find an option to change text from “paragraph” format to “heading” format, but apply that format only to words or short phrases that serve as headers (like you see on this page). Make sure the word or phrase has a blank line before and after it before you select it and apply heading format.
I recommend starting with level 2 for your largest heading and moving on to 3 and 4 for sub-headings. On this site, h2 produces the headings in blue and ALL CAPS, and the h3 produces headings in red.
You’ll see a difference in size in the post editing window, but you won’t know for sure what your theme does to each type of heading until you view the post on the front end.
ADJUST POST VISIBILITY & DELIVERY
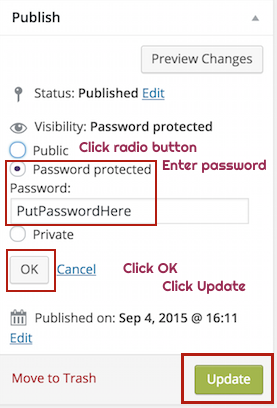
Password-protecting Posts
To hide a post behind a password, click the Edit link next to Visibility in the Publish section in the upper right corner of the post editing page.
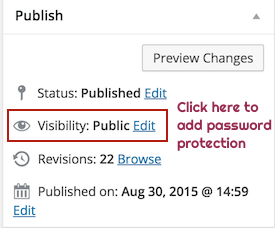
Then make the changes shown below and save them.
Marking Posts Private
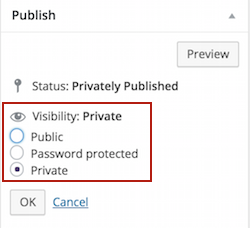
Posts marked “Private” are visible ONLY to you (as the post author and blog administrator) and to anyone else you’ve invited to the blog as an editor or administrator.
Scheduling Posts
Two things to note:
- WordPress uses the international format for expressing time, which starts 24 digits (instead of repeating 12 and adding AM or PM). So to enter the time as 5pm, you’d use 17:00 (because that’s 12 noon + five hours).
- Make sure you’ve selected the correct time zone on the General Settings page, as the default is NOT the Mountain Time zone!
CREATE & EDIT PAGES
STUDENTS: Looking for instructions on putting journal entries in pages? See this separate guide: HOW TO – Put Journal Entries on a Page in Your Blog
Pages are for content you want to make available on a top menu, rather than in your regular blog stream. Common pages include About (or Bio), Contact, and Portfolio (or Resume). Start paying attention to some of the featured blogs on WordPress.com and you’ll notice that most of them have pages in a top or side menu for items that aren’t part of the stream of posts with categories and tags.
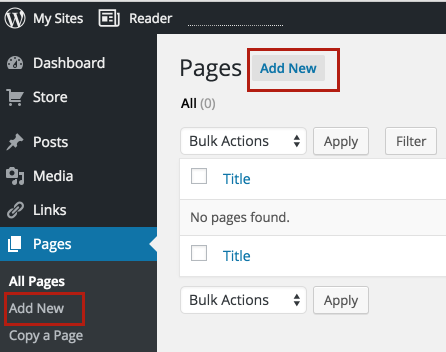
To create a page (for a purpose other than a journal), follow the steps below.
Create a New Page
Enter a title for the page, just like you would for a blog post.
Enter the Content & Publish
When you’re ready, click the blue Publish button.
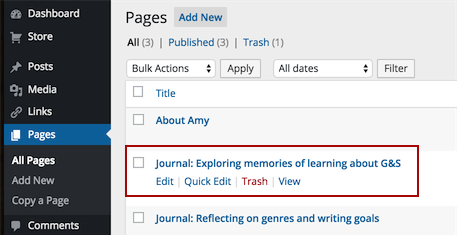
Edit Pages as Needed
You can also edit pages the same way you can edit posts. Click on the Pages tab on the sidebar and hover over an item to view the regular edit and quick edit links.
CUSTOMIZE THE TOP MENU
STUDENTS: Looking for instructions on how to hide your journal page from your blog’s top menu? See this separate guide: HOW TO – Put Journal Entries on a Page in Your Blog
By default, your theme is most likely set to show any pages on your blog in a navigation menu along the top (like the top menu on our Class HUB). You can control what shows up there (and what doesn’t) by creating your own custom menu.
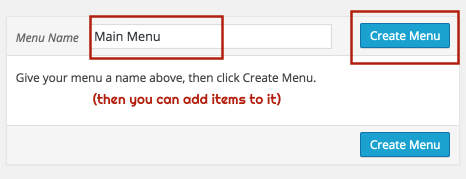
Step 1: Create New Menu
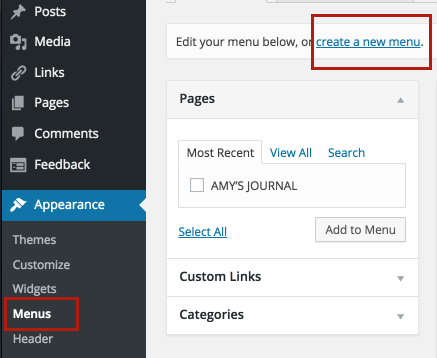
Give your menu a name and save it.
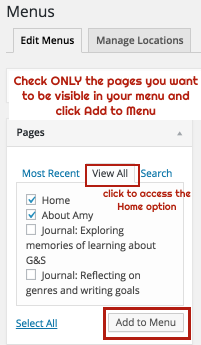
Step 2: Add Other Items to Menu
You can add other pages (as well as a “Home” button):
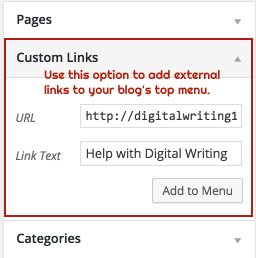
And/or custom links:
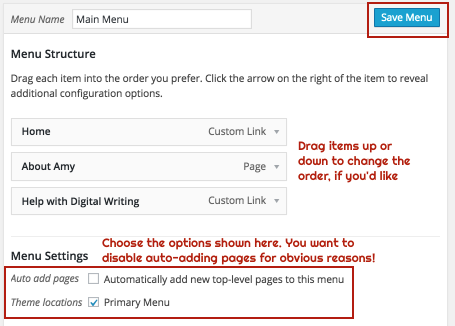
Step 3: Adjust Settings and Save Menu
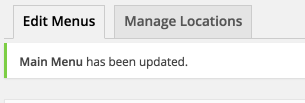
If your save was successful, you’ll see a confirmation like this:
Step 4: View Your New Menu

Troubleshooting Menus
As long as you don’t see a link to your Journal page anywhere on your blog’s front end, then that’s all that really matters. But if you’d like to better understand how your theme handles menus, I’d be happy to show you.