
Contents
STANDARDS FOR WEB-READY IMAGES
When you download or create an image to work with, aim for the highest quality possible so that you have plenty of detail available.
But when you’re ready to put the image on the web (in a blog post, as a header, etc.), follow the steps below to make it “web-ready” by reducing its width and compressing its file size.
Width & Height
Always measure these in terms of pixels, which is the unit of measurement for computer screens, not in terms of inches, which is the unit for print. Typically you only need to change either the width or the height, as the other will adjust automatically.
Finished Header Images: Images that serve as web site headers are rarely wider than 1000 pixels, as anything wider than that may not be viewable on all screens. Header images on our class blog should be 1000 pixels wide and 180 pixels tall.
Finished Images in Posts: Images you might embed in a blog post should be no wider than the post itself, which is around 680 pixels for our class blog. Wider images may run over into the sidebar.
Each Image in a Header: The individual images you use to assemble a blog header should each be exactly 180 pixels tall, so that they easily go onto a canvas that’s 1000 x 180 pixels. The width of each will vary, depending on how much of the image you want to show.
File Size
Images that will load as part of a web page (rather than as separate files) should be compressed to a small enough file size that they load quickly, even over slow internet connections. Users whose internet connections limit how much data they can load each day (like me) will also appreciate images that are small in file size.
Ideally all images will be under 300kb in file size, but if a file needs to be in png format, under 500kbs may be the best you can do.
This file size applies to complete images, like a finished blog header, not to the individual images that go into creating a header.
FILE FORMATS
When you want an image to display on the web, it needs to be in a web-ready format. Currently that includes: GIF, JPG, and PNG. GIF is an older format that’s now used mainly for animated GIFs and simple drawings. JPG is best for photos and PNG is best for images with clean lines and edges, like line drawings or some screenshots.
All image editing apps can export or save files in one of these formats. In Preview for Mac, go to the File menu and choose Export. Then choose JPG or PNG from the format options.
RECOMMENDED APPLICATIONS
See also: DESKTOP, MOBILE & WEB APPS for Editing and Composing with Images
Mac Users
The easiest and fasted way to make simple adjustments like these is to use Preview, which comes free with the Mac OS.
I strongly recommend that you use Preview instead of iPhoto for two reasons: (1) Preview gives you more control; and (2) the best use for iPhoto is for personal photos, not images you might use for other purposes.
I also recommend that you use Preview instead of Photoshop or other full-featured apps because Preview is faster and easier to use. I have it set as the default app to open images and PDFs on my MacBook.
The steps below provide instructions on using Preview, although the basic concepts apply to any image editing app.
Windows Users
You can make the simple adjustments described below in Paint, which comes free with the Windows OS. For instructions on using the Windows 7 version of Paint, see: Resize an image and Crop a picture.
EDITING IMAGES IN PREVIEW FOR MAC
Opening an Image in Preview
If Preview is the default viewer for images outside your iPhoto library, double click on the image to open it.
If Preview is not the default viewer, right-click (or control-click) on the image file in your Finder and use the “Open with” menu to choose Preview.
This screenshot shows what the “Open with” menu looks like on my MacBook, where I’ve already set Preview to be the default app to open jpg and png files.

To make Preview your default viewer for these file types, adapt the steps on this page: How to make Preview the default PDF reader on a Mac
Cropping an Image
If you only want to use a portion of the image, you can crop it by following the steps below.
(1) With the image open in Preview, choose Rectangular Selection from the Tools menu and then use your cursor to draw a box around the portion of the image you want to KEEP. (Everything outside the box will be cropped out.)

If you didn’t draw the selection box just right the first time, you can adjust it rather than re-do it, using the circles you can see in the screenshot above. To change the overall size of the selection, click and drag on the circles in the corners. To reposition the selection, click and drag on the circles along each side.
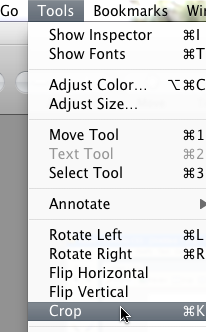
(2) Use the keyboard shortcut command k OR choose Crop from the Tools menu.
Adjusting Width and Height
(1) With the image open in Preview, choose Adjust Size under the Tools menu.

(2) If the image dimensions are shown in inches, change to pixels using the drop down menu.
![]()
Unless you want to squash or stretch the image, leave the “Scale proportionally” box checked. That way you only have to change one of the options (width or height) and the other will change automatically.
Finished Images: For a finished image ready to go on the web, change only the WIDTH in pixels, using the number appropriate to how you plan to use the image, as described under the Standards section, above.
Each Image in a Header: For individual images you plan to use in a blog header, change only the HEIGHT in pixels, using the number given under the Standards section. The width will vary, but keep in mind that when you put all the images together, they’ll need to add up to 1000 pixels wide.
Adjusting File Size
(1) If you’ve already closed the image, open it again and choose Adjust Size from the Tools menu. At the bottom of the dialog box, you’ll see how large your file currently is in KB (kilobytes), as well as what size it would become if you were to make changes in width or height.

(2) If the file size in KB is smaller than the numbers shown under the Standards section, above, you’re good to. If the size is larger, you’ll need to reduce either the height or width further.
Or, if the image in png format and doesn’t really need to be, use the Export option under the File menu to convert it to jpg format instead. Images saved in jpg format won’t change size in terms of height and width, but because this format compresses the data in the image file, the file size will go down by more than half.
Use png format only for images that contain text or boxes (like screen shots) or line drawings (like illustrations).
Renaming the File
If you forgot to give the image a helpful file name when you first created or downloaded it, do so now, using the Rename option under the File menu.
But make sure you leave the file extension (.jpg or .png) intact, as the extension is what enables web browsers to know what to do with the file.
For example, this is NOT a very helpful file name:

But this file name will be much more helpful when you’re browsing through dozens of photos and trying to find the right one:

Saving the File
Choose Save from the File menu (or Save as if you want to keep the original). Then you can upload the image to a blog post or some other web site.