The instructions below are for Camtasia for Mac, which you can download and use for 30 days in the “trial period” mode.
Also see: How to install Camtasia for Mac (which also has helpful info for installing any app you download)
REMINDER: When using a new app, it’s always a good idea to make test version first, before you record a full version, just to make sure you’ve got the video and audio settings working correctly. You don’t want to deliver the most eloquent analysis you’ve ever given, only to discover that your microphone wasn’t on!
ALSO NOTE: When you’re using a screencasting app, I recommend that you quit all other running applications so that the screencast app has access to as much RAM (memory) as possible. You might even want to restart your computer and launch only the screencast app and your web browser, particularly if your computer has only 2gb of RAM or less.
SCREENCAST
STEP BY STEP INSTRUCTIONS
(1) When you launch Camtasia, you’ll first need to check the box agreeing to the terms of the trial period, and then you’ll see a ribbon with some recording options you can choose from.

The far left button lets you choose full screen or a portion of the screen. Leave it set to full screen. The next button lets you turn your computer’s internal or attached web cam on or off, depending on whether you want the screencast to include a small video insert of you talking. The third set of buttons let you choose the source for audio input. For the top one, choose your internal microphone (or an external one, if applicable). You can leave the bottom button unchecked as you probably don’t need to record audio that plays on the computer.
(2) When you’re ready to begin, click the red Record button.
(3) When you’re finished, go to the red filmstrip icon in the menu bar and choose Stop Recording.

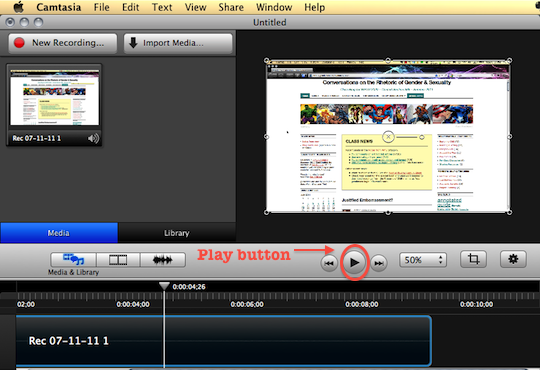
(4) The recording will appear in a new Camtasia editing window. Click the play button to preview it.

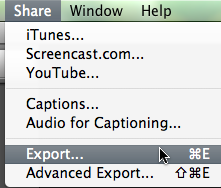
(5) If all looks (and sounds) good, go to the Share menu and select Export.

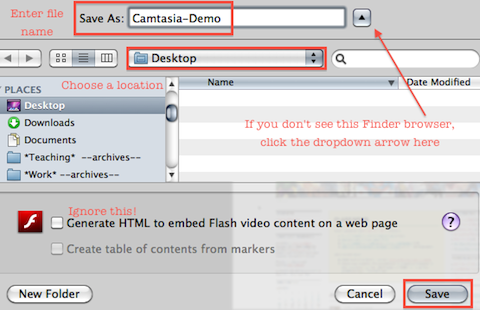
(6) Give the file an appropriate name and location and click Save.

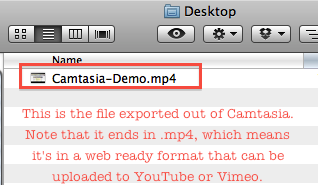
(7) It will take Camtasia a few minutes to export the file, and then it will present a pop-up window that allows you to find the file in the Finder. The exported file will end in mp4, which you can upload to a video sharing site.

For more help, see the Camtasia for Mac help pages.
UPLOADING PROBLEMS?
If you upload the video file to Vimeo, keep in mind that for free accounts your video will go into a queue to be converted when the site has the resources available, which usually happens within an hour of uploading but might take longer depending on how busy the site is and how large the file is. You might as well upload the video and then check back later (or wait to get the email from Vimeo letting you know the video is ready). Vimeo will accept videos that are much larger and longer than what YouTube will accept, so I recommend it over YouTube, but you should keep in mind that uploading any video to any site will take time, so plan accordingly!
