
When you first log into the class blog, you’ll see the Dashboard, but you don’t really need to do anything here. Just ignore the Dashboard and instead follow the steps below to create your first post.
CREATE A NEW POST
To create a new post, click the +New button in the member menubar and select Post.

HIDE UNNECESSARY ITEMS
(First Post Only)
When the new post interface loads for the first time, it has some stuff on it that you don’t need to bother with, so hide those items now and they’ll remain hidden every time you create a new post.
Click on the Screen Options tab in the upper left corner and uncheck everything, except categories and tags, as shown here:

ENTER CONTENT
You only need to pay attention to these FOUR parts of the interface: subject line, message body, category menu, and publish button, as marked in red on the screenshot below. Scroll down for tips on how to use each part.
FYI: WordPress will autosave your draft every few minutes.

SUBJECT: Type something in the subject line right away (just trust me on this, it prevents a problem later on). You can always change the subject line later, if you can’t think of something interesting at first.
Ideally your subject line should convey something about your post that makes it sound appealing to other readers, so that you gain some practice at rhetorically aware writing for real-world audiences. In other words, a subject like “Bob’s homework” is not very rhetorically aware.
CATEGORY: Choose the category that corresponds with the assignment you’re posting. That’s how we’ll know what assignment you’re responding to, which is why we don’t need you to repeat that in the subject line.
MESSAGE: For the message body, I recommend either typing directly into it or pasting your message as text only, without any formatting. Then use the WordPress toolbar to apply formatting, like bold, italics, headers, and so on, if you wish. The toolbar also makes it easy to include hyperlinks and images.
PUBLISH THE POST
While your draft will be autosaved every few minutes, it won’t appear on the “front end” of the blog until you publish it. So the last step is to check over your post to make sure you included everything and don’t have glaring typos, and then click the blue Publish button.
To see what the post looks like now that it’s been published, click on the View Post link that appears at the top:

MORE DETAILS
Post Editing Interface
This screenshot explains all the elements on the editing page. (Yours may have slightly different elements but the basic functions should all be there.)

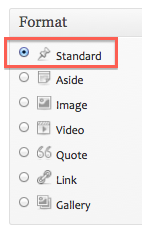
NOTE: If you see a box for Format on your post editing page, please leave that set to Standard, as shown below:
Formatting Text
Another way to entice readers to read your posts is to follow the conventions of web publishing, rather than print publishing. See: Use reader-friendly formatting.
Tags
Tags are like keywords that describe the content of your post. The more often a keyword is used, the bigger it will become on the “tag cloud” on the blog sidebar, so use existing tags when possible. Use only lower case letters for tags and try to use tags that already exist, when applicable. Use a new tag only if none of the existing tags seem appropriate.
Add Links and/or Media
Adding hyperlinks as well as images and videos will definitely entice readers to view your post, as these are common conventions of web writing. However, choose your links and media wisely so that you don’t annoy readers with irrelevant material.
Also be sure to follow the customs for how to format these elements. For example, don’t simply paste a full URL into your post. Instead, create a hyperlink out of a relevant word in your message. And don’t simply create links to images and videos if you can embed them into your posts.
Here are some how-to’s available on this site:
Save a Draft?
If you’re not yet ready to submit your post, you can save it as a draft and return to it later. If you do that, put (draft) in the subject line and remove it when you’re ready to publish the post. Otherwise I may end up publishing the post on the assumption that you simply forgot that step.
Text vs. Visual Mode
For information on all the post editing options available in both Visual and HTML editing modes, see this handout: Overview of post editing options.
TROUBLESHOOTING
If you don’t see your post on the class blog main page, chances are that you either left the post in draft status rather than publishing it OR that you forgot to assign it a category. Return to the Posts page and open the post to edit it and correct those mistakes. (See this handout: HOW TO – Edit Your Blog Post.)
If you look for help by searching Google, please keep in mind that our class blog is powered by a custom version of WordPress, as described on wordpress.org It is similar to but not exactly the same as WordPress.com, so help pages that apply to WordPress.com may not apply to our class blog.
Please always feel free to contact me for technical help, as I don’t expect students to already know how to use the blog on their own!