
Being able to highlight passages and put notes on a PDF file is extremely useful, particularly for students who don’t want to have to print out lots of documents but who need to take notes on them either to learn the material or to use the material in a paper.
Preview for Mac OS 10.8 and 10.9
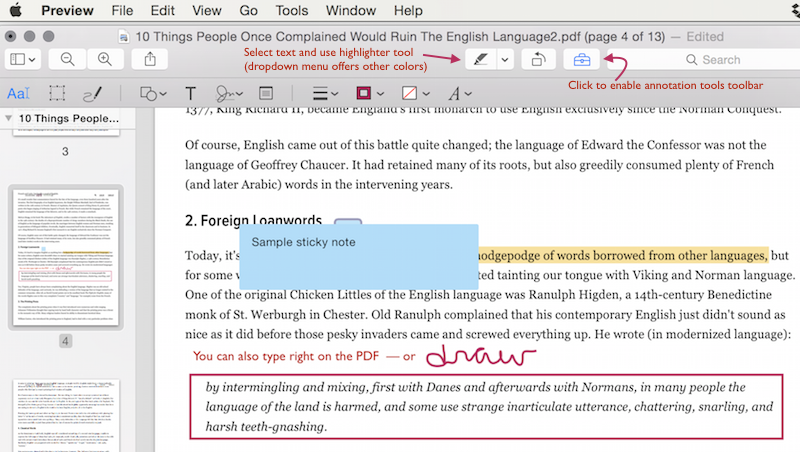
The Preview interface has changed since I wrote the instructions further down this page, but the same concepts apply. Here’s a screenshot of the new interface (click to enlarge):
For a more detailed overview, see this 2013 MacObserver article: How to Get the Most from Preview in OS X: Annotating
Preview for Mac OS 10.6
The instructions below show you how to annotate a PDF file using Preview, which is the PDF and image viewer that comes installed on all Macs. These instructions are for the version of Preview that came with Mac OS 10.6. (If you have an older version of Preview, see the note at the bottom of the page.)
STEP-BY-STEP INSTRUCTIONS
(1) Open the PDF in Preview. (If it opens in another app by default, then either right-click or control-click on the PDF file in the Finder and choose Preview from the “Open with” options or launch Preview, go to the File menu, choose Open, and locate the PDF. (To make all PDFs open in Preview, see: Make Preview your default PDF reader)
(2) Go to the Tools menu and down to Annotate, which will show you a dropdown menu of annotation tools.

(3) The tool you’ll use most often is the Note tool, so select that. Once you’ve activated the Note tool, you can click anywhere in the PDF to insert a note. Notes look like this:

(4) Once you’ve selected one Annotation tool, you’ll also see a ribbon appear at the bottom of the screen that contains all the Annotation tools, as well as the option to change the color of the tool.

(5) Use the icons in the ribbon to activate a particular tool, and then click or draw on the PDF where you want to insert the tool. As long as the inserted object is selected, you can modify or delete it.
“Selected” means it has a grey box around it or grey dots. You can click and drag on the dots to resize text boxes, rectangles, and arrows, or you can click in the middle of the object to move it around. If the object you want to modify is not currently selected, click on the icon in the ribbon that corresponds to the type of tool you used to insert the object, then click once on the object to select it.
To delete a note, right-click or control-click on the bubble and choose delete, as shown below.
(6) Save the PDF and post where appropriate.
HAVE AN OLDER VERSION OF PREVIEW?
If your version of Preview doesn’t have the tools shown above, that most likely means you’re using an older version. (You might want to upgrade to the most recent Mac Operating System — it’s inexpensive, comes with lots of new features, and also improves security and performance!)
If you’re not able to upgrade or to borrow a Mac with a more recent version, you can try using Adobe Reader, which is most likely already installed on your computer. But I advise against it as students have had trouble with it in the past. You might instead do a Google search for a PDF annotation app that is either free or has a free trial mode. Try a set of keywords like:
free PDF annotation Mac or comments PDF Mac.