
UNDERSTANDING THE STORYBOARD
The main purpose of a storyboard is to help readers and producers figure out the best structure to use in order to bring the plot to life. Early stage storyboards help a screen writer pitch a story idea, while later stage storyboards help the the production team actually start assembling the video.
Storyboards typically take the form of a series of panels (like you might see in a comic book), with each panel featuring the main elements needed for each scene or “shot.” By “shot” I mean each segment of continuous video that moves the story forward, which might span a whole scene or count as one of many shots that make up a scene. For a three minute video story, each scene or shot would likely last around 5-10 seconds.
PREPARING A STORYBOARD
The storyboard should focus only on video composition techniques. The plot should be conveyed in a synopsis.
In your storyboard, use one panel for each shot, including the visual action and a description of composition techniques.
Options for Creating Panels
Option 1: Slides: The easiest way to make a storyboard is to use a slide app like PowerPoint, Keynote, or Google Slides, with each slide serving as a panel. Use title slide layout for the opening slide, which should feature your story title and your name, and use two-column layout for the remaining slides. (Keynote
Option 2: Table: Another serviceable (but less attractive) option is to use a two-column table in a word processing app like Word or Google Docs. Put the story title and your name at the top, and then use each row of the table as a “panel.”
Option 3: Use a mobile app designed for storyboarding. Or search for desktop or web-based apps for this purpose.
Left Panel Content: Visuals
In the left column of each panel, depict the main visual action (what we’d see on screen). You might include a sketch you made by hand or on a digital device, a photo, or some other kind of image.
Right Panel Content: Composition Notes
In the right column of each panel, provide the kind of “film making” details that will help readers create a “mental movie” of your story. To save on space and make them easier to read, provide these details in bulleted lists.
These details might include: type of shot, framing technique, camera movement technique, dialogue, soundtrack, special effects, transitions, and/or other cinematic techniques.
If one panel introduces an element that will span multiple panels, like background music, then subsequent panels should indicate any changes, if applicable (such as increases or decreases in volume or tone).
MORE ON STORYBOARDING
Preparing Your Storyboard
Your storyboards should have two panels: (1) one for a mockup of what will appear on screen for that scene; and (2) one to describe the technical details that will go into composing that scene in video format.
Technical details include dialogue, soundtrack, type of shot, camera angle, special effects, in and out transitions, and other cinematic techniques. If an element began on an earlier panel (like a soundtrack), subsequent panels should indicate any changes for each new scene, until that element ends.
I chose the resources below to help you understand and apply those technical details:
- How to make a storyboard and shot list
- Storyboarding Your Film
- Camera Movement Techniques
- Video Camera Shots
- Cinematic techniques
- Vimeo’s Video School: Video 101 (lots of lessons, including scripting, storyboarding, and making shot lists)
- How to create an awesome video shot list
Also do some Google searches to learn more about different approaches to storyboarding as well as the variety of video composition techniques you might draw on to compose your multimedia story.
Choose a Format
You may develop your storyboard using whatever application and layout you find most helpful, as long as it gives you the ability to have at least two panels per scene. The panels can be side-by-side or one above the other.
If you need to include a lot of details on the technical side, you might consider using a word processing app and creating new pages for each panel, with the visual notes in the top portion and the technical details in the bottom portion. That would give you more room to work than trying to squeeze everything into a two-column table.
Another option is to use PowerPoint, which is what I typically use. You’re not limited to the pre-defined layouts for slides. In fact, I find it easier to start with the “blank” layout and then drag in images ad/or create text boxes wherever I need them.
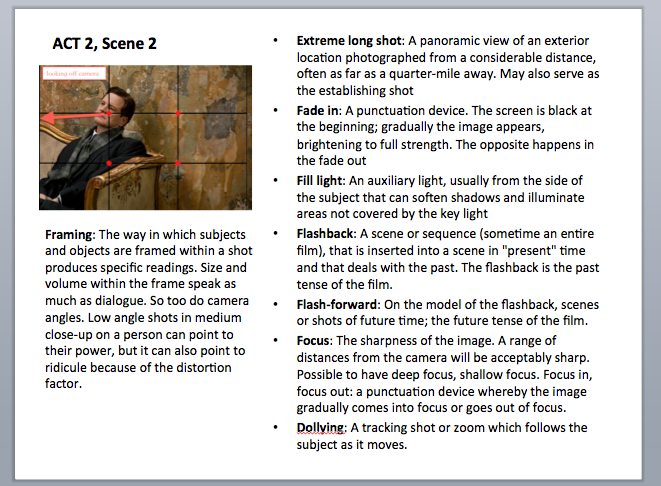
Below is an example of what a storyboard panel made in PowerPoint might look like for someone who needed to include a lot of technical details for a scene. (If you don’t have many details, then the standard side-by-side layout would work fine.) The screenshot is from the King’s Speech (specifically from my page on Composing and framing videos), and the text is directly from Wikipedia’s page on Cinematic Techniques The text is NOT an example of what you would write, just an example of how you might format your technical details.
Develop Your Draft
Using what you learned from the readings above, develop a draft storyboard for your multimedia story. Start with a broad set of panels for each “act,” and then work on filling in the smaller panels for each scene that makes up an act. To review what I mean by “act,” see the Art of Storytelling section on the Multimedia Story: Plot page.
The purpose of this storyboard is to help you plan your video before you begin the time-consuming process of “shooting” and editing. As you work on the storyboard, you’re likely to discover that some of your earlier ideas won’t be easy to pull off given your time constraints, your access to materials, and/or your level of skill with video. And you’ll be MUCH happier to discover this now, through the storyboard, then later, when you’re scrambling to put the video together.
The storyboard also gives you the opportunity to get feedback on your ideas for video composition long before you start shooting If you waited until after you had a rough cut assembled to get feedback, and someone suggested a very different approach that you like better than what you did, you may end up feeling frustrated that you spent all that time composing something you don’t end up using.
Identify Your Assets
Another purpose for preparing a storyboard is to help you identify the kinds of assets you’ll need to assemble your video. This is particularly helpful for those students who tend to be a bit too ambitious, as they may quickly realize when putting together an asset list that they’ve set themselves up for much more work than they anticipated.
On the last panel of your storyboard, include an asset list that covers the following:
Existing Media: any audio, images, and/or video you already have that you plan to use to assemble scenes, including those you created as well as re-usable materials you found online.
New Shots: the shots you will need to capture (through live video recording, animation, screencasting, etc.) to assemble your scenes, with a few notes on the type of shot. For example: over the shoulder shot of the children the reaper is looking at. If you’re working with live video, you might also plan to capture some “B roll” footage.